
How to Save Config in CS 1.6 – 3 Working Methods
Last updated: May 4, 2026
If your Counter-Strike 1.6 settings reset after every launch or server join – sensitivity, crosshair, key binds – the config file is not being saved or protected correctly. This guide covers three methods to save your CS 1.6 config permanently – how to save config in CS 1.6 using console commands, manual file editing, and autoexec. Works for both Steam and Non-Steam versions. If your installation is corrupted, download Counter-Strike 1.6 first.
Method 1 – Save CS 1.6 Config Using writecfg
The fastest way to save your current CS 1.6 settings is the writecfg command. It writes all active settings to a config file in your cstrike folder.
- Open CS 1.6 and configure your settings – sensitivity, binds, crosshair, resolution.
- Press
~to open the developer console. - Type your settings directly if needed. Examples:
sensitivity "2.3" bind "mouse1" "+attack" cl_crosshair_color "3" - Save all current settings to a file:
writecfg myconfig
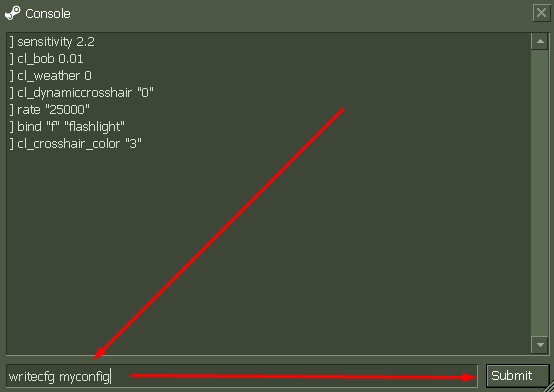
This creates myconfig.cfg in your cstrike folder. You can use any filename – prosetup, sniper, cfg2025.
![]()
To load your saved config at any time:
exec myconfig.cfg![]()
To update the file after making new changes – run the same writecfg myconfig command again. It overwrites the existing file.
Multiple Config Files for Different Playstyles
You can maintain separate configs for different situations:
| Command | Use Case | Load With |
|---|---|---|
writecfg awp |
AWP / sniper settings | exec awp.cfg |
writecfg practice |
Aim training settings | exec practice.cfg |
writecfg competitive |
Competitive match setup | exec competitive.cfg |
Method 2 – Manual config.cfg Editing
Direct file editing gives full control over all settings without launching the game. Use this when you want to batch-configure many settings at once or restore a known-good setup.
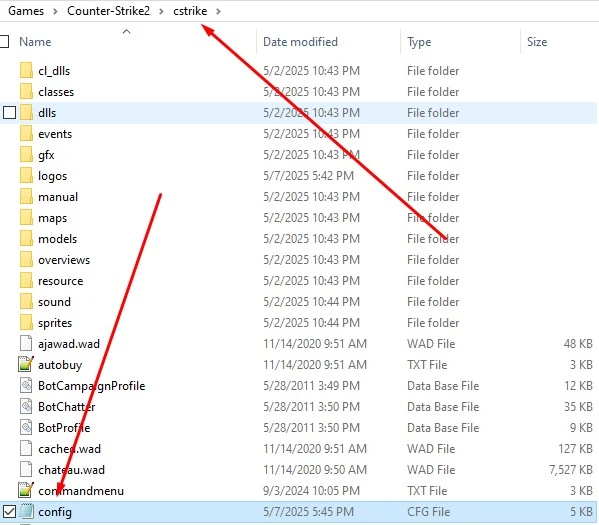
- Navigate to your CS 1.6 cstrike folder (see locations below).
- Open
config.cfgwith Notepad. - Find and edit the lines you want. Common settings:
sensitivity "2.5" bind "mouse1" "+attack" cl_crosshair_size "small" volume "0.7" hud_fastswitch "1" - Save the file – do not change the extension or encoding.
- Right-click
config.cfg→ Properties → check Read-only. This prevents servers from overwriting your settings. - Restart CS 1.6 to apply changes.
Method 3 – autoexec.cfg Auto-Load
autoexec.cfg runs automatically every time CS 1.6 launches. This is the most reliable method for settings that must survive reinstalls and server changes.
- Create a file named
autoexec.cfgin yourcstrikefolder. - Add your settings:
cl_dynamiccrosshair "0" rate "100000" cl_updaterate "101" cl_cmdrate "101" sensitivity "2.5" exec userconfig.cfg - Save the file and set it to Read-only.
For Steam users – you can also add +exec autoexec.cfg to Steam launch options (Library → right-click CS 1.6 → Properties → Set Launch Options) to guarantee it executes on every startup.
For the complete settings protection guide including userconfig.cfg setup, see CS 1.6 settings not saving fix.
Counter-Strike 1.6 Config File Locations – Steam and Non-Steam
| Version | Config folder path |
|---|---|
| Steam | C:\Program Files (x86)\Steam\steamapps\common\Half-Life\cstrike\ |
| Non-Steam | C:\Games\Counter-Strike 1.6\cstrike\ |
Both versions use identical file names – config.cfg, autoexec.cfg, userconfig.cfg. The only difference is the folder path.
How to Save CS 1.6 Config – Quick Reference
| Command / Action | Effect |
|---|---|
writecfg myconfig |
Saves current settings to myconfig.cfg |
exec myconfig.cfg |
Loads a saved config file in-game |
host_writeconfig myconfig |
Alternative to writecfg – saves to specific filename |
| Edit config.cfg manually | Full control, apply on next game launch |
| autoexec.cfg | Auto-loads on every CS 1.6 startup |
| Read-only on config.cfg | Prevents servers from resetting your settings |
+exec autoexec.cfg in launch options |
Steam – guarantees autoexec runs on startup |
To obtain the stable version safely plus you can explore more Counter-Strike 1.6 resources, feel free to use our links. Ready to jump into the action?