
How to Make a Custom Spray in Counter-Strike 1.6
Last updated: May 8, 2026
A custom spray in Counter-Strike 1.6 is a personal decal that appears on walls, floors, and surfaces when you press the spray key (default T). Creating a CS 1.6 custom spray requires converting your image to a tempdecal.wad file using HL Tag Converter. This guide covers the full process – image preparation, conversion, installation, and keeping the spray permanent. If you do not have CS 1.6 installed yet, download Counter-Strike 1.6 first.
Table of Contents
- What you need
- How to create a CS 1.6 custom spray – step by step
- Keep your spray permanent – Read-only fix
- Custom sprays on servers
- Troubleshooting CS 1.6 custom spray issues
- Advanced tips
What you need
| What you need | Details |
|---|---|
| An image file | JPG, PNG, or BMP format. PNG with transparent background gives the best result. Recommended size: 256×256 pixels square. |
| HL Tag Converter | Free tool that converts images to the WAD format CS 1.6 uses. Download HL Tag Converter |
| CS 1.6 cstrike folder – Steam | Steam\steamapps\common\Half-Life\cstrike\ |
| CS 1.6 cstrike folder – Non-Steam | Counter-Strike 1.6\cstrike\ |
How to create a CS 1.6 custom spray – step by step
- Download and extract
hl_tag-converter.zipto any folder. - Run
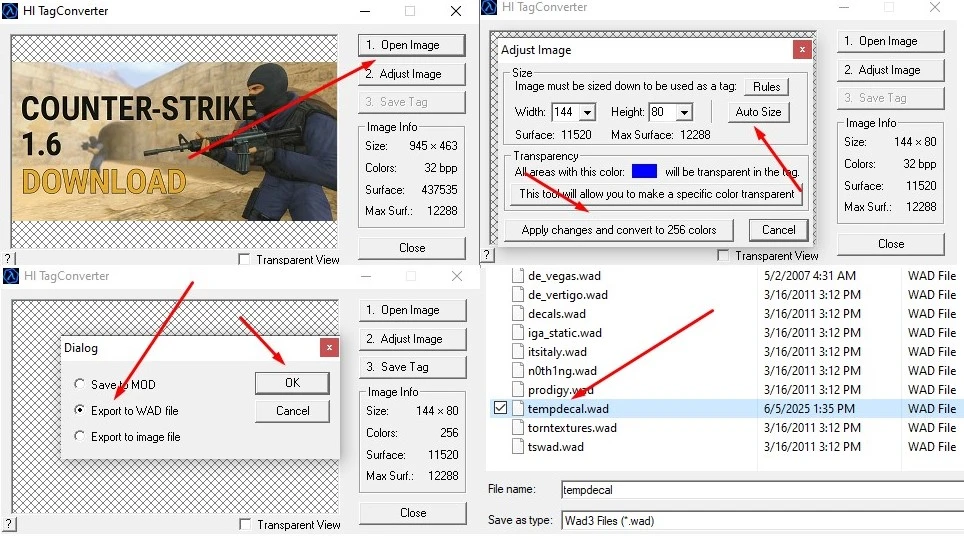
hl_tag-converter.exe. - 1. Open Image – click the “1. Open Image” button and select your image file. Image Info shows current size and surface values.
- 2. Adjust Image – click the “2. Adjust Image” button. A separate Adjust Image window opens with Size and Transparency settings.
- Auto Size – click “Auto Size” in the Adjust Image window. The Surface value must not exceed Max Surface (12288). If it does, reduce Width and Height manually until within limits.
- Apply changes and convert to 256 colors – click this button. Colors in Image Info changes from 32 bpp to 256. This converts your image to CS 1.6’s color palette.
- Close the Adjust Image window.
- 3. Save Tag – click the “3. Save Tag” button. A dialog with three options appears – select Export to WAD file and click OK.
- Navigate to your cstrike folder in the file browser. Find and select
tempdecal.wad. - Click Save – confirm Yes when asked to replace the existing file.
- Launch CS 1.6 – press T in-game to apply your custom CS 1.6 spray.
Also confirm sprays are enabled in game options: go to Options > Multiplayer > Advanced and set Custom player sprays to Enabled. Without this setting active, your spray will not appear even if the file is correctly placed.
Keep your spray permanent – Read-only fix
CS 1.6 overwrites tempdecal.wad with the server’s default spray every time you join a server. Setting the file to Read-only prevents this. This is the most commonly missed step – without it your CS 1.6 custom spray resets every session.
- Open your
cstrikefolder. - Right-click
tempdecal.wadand select Properties. - Under the General tab, check Read-only.
- Click Apply, then OK.
Your CS 1.6 spray logo now survives server joins and game restarts.
Custom sprays on servers
Not all servers allow custom sprays in CS 1.6. Many server admins disable player sprays entirely due to inappropriate images or spam. If your spray does not appear on a specific server, this is a server-side restriction – your installation is correct.
| Situation | Cause |
|---|---|
| Spray visible on some servers, not others | Server has disabled custom player sprays via sv_allowupload 0 |
| Spray visible to you but not other players | Server has disabled spray download for clients via sv_allowdownload 0 |
| Spray resets every join | tempdecal.wad not set to Read-only |
| Spray shows default CS logo instead of your image | WAD file was saved to wrong folder or wrong filename |
Troubleshooting CS 1.6 custom spray issues
Spray not showing in-game
| Problem | Fix |
|---|---|
| tempdecal.wad in wrong location | Verify the file is directly in the cstrike folder, not in a subfolder |
| File not set to Read-only | Right-click tempdecal.wad > Properties > check Read-only > Apply |
| Sprays disabled in game options | Options > Multiplayer > Advanced > Custom player sprays > Enabled |
| Server blocking sprays | Server has sv_allowupload 0 – nothing to fix client-side |
Spray looks pixelated or distorted
| Problem | Fix |
|---|---|
| Low quality after conversion | Start with a higher resolution source image – low-resolution originals produce low-quality sprays |
| Spray looks stretched | Use a square image – 256×256 pixels recommended. Non-square images get stretched to fit the game’s aspect ratio |
| Colors look wrong | PNG converts better than JPG. Use PNG with transparent background for best results |
HL Tag Converter crashes or does not open
| Problem | Fix |
|---|---|
| Program does not launch | Right-click hl_tag-converter.exe > Properties > Compatibility > check “Run this program in compatibility mode for Windows XP (Service Pack 3)” |
| Antivirus blocks the executable | Add hl_tag-converter.exe to antivirus exclusions. It is a legacy tool that triggers false positives on some antivirus programs |
Advanced tips for CS 1.6 sprays
Transparent sprays
Use a PNG image with an alpha channel (transparent background). The transparent areas will show the underlying surface texture instead of a solid color box. This produces logos and designs that blend into any wall or floor. The GoldSrc engine does not support partial transparency – pixels are either fully transparent or fully opaque.
Best image size
| Image size | Result |
|---|---|
| 256×256 px | Best – fills the spray area cleanly with no stretching |
| 128×128 px | Good – slightly smaller spray in-game |
| Non-square (e.g. 1920×1080) | Gets stretched – always crop to square before converting |
Switching between multiple sprays
CS 1.6 only reads tempdecal.wad. To switch sprays, replace the file with a different converted WAD. Keep backups of your converted WAD files under different names (e.g. spray_logo.wad, spray_meme.wad) and copy the one you want as tempdecal.wad when switching. Remember to re-enable Read-only after replacing.
Animated sprays
CS 1.6 does not natively support animated sprays on the client side. Some servers run plugins that enable animated decals server-side, but this requires server admin setup and is not controlled by the player.
Video tutorial: https://www.youtube.com/watch?v=rXd8OiqLHxU
To grab the original download Counter-Strike 1.6 build here or explore more Counter-Strike 1.6 resources, feel free to use our links. If you are looking for extra content.